DMARC Setup guide
Overview of DMARC
DMARC (Domain-based Message Authentication, Reporting, and Conformance), defined in its most basic terms, is an open email authentication protocol to protect an email domain from unauthorized use like email spoofing, phishing attacks via impersonation, and other cyber attacks or crimes.
Unfortunately, DMARC is not enabled by default for all domains, web hosts, or email servers. Organizations and email administrators must establish and put up policies for DMARC. Concerted efforts by the governments in the UK, US, Canada, Australia, New Zealand, Denmark, among others, and financial regulators like those in India (The Reserve Bank of India) and UAE (Central Bank of UAE) have sanctioned the DMARC protocol as a mandatory technology for governmental departments and entities.
In this series, we give an introduction to the components that make up DMARC including Sender Policy Framework (SPF) and DomainKeys Identified Mail (DKIM).
Setting up SPF
SPF is an email authentication method for detecting forged sender addresses during email delivery. SPF is confined to detecting falsified sender claims in the email’s envelope, which is used when it bounces back.
Follow these five simple steps to set up an SPF record:
Step 1: List IP addresses that are used to send emails
Domain admins need to examine what mail servers are being used by their domain to deliver emails. They need to list down all the mail servers and sources that send emails on the domain’s behalf.
Step 2: List all sending domains
Domain admins must ensure that all domains under their ownership have SPF records published even if a few authorized domains are no longer used to send emails regularly.
Step 3: Create the SPF record
Follow the steps given below to create an SPF record:
- An SPF record should always start with the version number v=spf1 (version 1). This tag defines the record as SPF.
- Add all IP addresses that are authorized to send an email on the domain’s behalf.
- For any third-party organization that sends emails on the domain’s behalf, you may use an ‘include’ tag, such as include:newdomain.com.
- You should end the record with an ‘all’ tag once all IP addresses have been implemented and include tags. The ‘all’ tag has the following basic types:
- -all: Servers that aren’t listed in the SPF record are not authorized to send emails, i.e, emails that fail will be rejected.
- ~all: If the email is received from a server that isn’t listed, the email will be marked as a soft fail, i.e emails will be accepted but marked.
- +all: It is not recommended to use this option as this tag allows any server to send emails from your domain.
Step 4: Add your SPF record to DNS
Work with the DNS server administrator to add the SPF records to DNS so that mailbox providers can use it.
Step 5: Test your SPF record
You can easily use the SPF check tool to check the SPF record created. You’ll be able to view what your recipients see. You can include one or more of your valid sending IP addresses if they aren’t mentioned.
Setting up DKIM
DKIM consists of two parts:
1) A DNS record with a public cryptography key that is used to verify whether a sender is authorized to send an email for a specific domain
2) A private key that is used to sign an outgoing email.
Adding a DKIM record to a domain’s DNS follows almost the same steps as adding an SPF record.
Step 1: Create a domain key for your website
Use any tool available based on the operating system to create a domain key for your website.
Step 2: Add a public key to the DNS entries for your domain.
This key can be used by email servers to validate DKIM signatures in your emails. Here’s a list of the most popular DNS providers with links to official and third-party documentation.
Step 3: Begin applying a DKIM signature to all outgoing messages by enabling DKIM signing
Setting up a DKIM signer on a mail server is another integral part of the process, which is a difficult task for many email systems. The only exception is Google’s G Suite, which provides a clear how-to tutorial for setting up a DKIM signer. For Microsoft Office 365, users can take advantage of Microsoft’s comprehensive guide on how to implement DKIM signing on that platform.
Setting up DMARC
After setting up SPF and DKIM, it is time to implement DMARC. You can do this in a DNS record without first configuring SPF and DKIM, but it will have no effect. According to DMARC regulations, SPF and DKIM records should be handled by email servers. A key feature of the DMARC policy is that it includes a reporting mechanism that allows domain administrators to check if an email is failing authentication or if an attacker is attempting to impersonate a certain domain.
Just like SPF and DKIM, setting up DMARC is very easy. It is a simple one-line entry in the domain’s DNS records.
- Log into your domain registrar and select ‘Manage or Configure DNS Settings’ from the drop-down menu.
- Select a ‘TXT’ record and hit the ‘Add a New Record’ button.
Refer to the following DMARC record:
v=DMARC1; p=none; rua=mailto:reports@emailauth.io; ruf=mailto:reports@emailauth.io; adkim=r; aspf=r; rf=afrf
- The “p” tag has three options: None, quarantine, or reject. These instruct the server on what action is to be taken against an email that fails authentication.
- The adkim and aspf options define how strictly DKIM and SPF policy should be applied, with ‘s’ indicating strict and ‘r’ indicating relaxed.
- The RUA tag provides an address for aggregate data reports, whereas the RUF tag provides an address for forensic reports.
Testing and Maintenance
Implementing DMARC in a test environment is merely the first step in the DMARC journey. It is critical to test SPF, DKIM, and DMARC configurations to ensure that the defined policies perform as intended and do not block legitimate emails. Hence, a user can first start with more relaxed and quarantine options.
Organizations can use DMARC reporting and forensics to monitor their email domains’ activities. While it is possible to examine and parse each DMARC report email to determine what is going on, this is not a scalable solution.
DMARC Setup Guide for Popular Hosting Providers
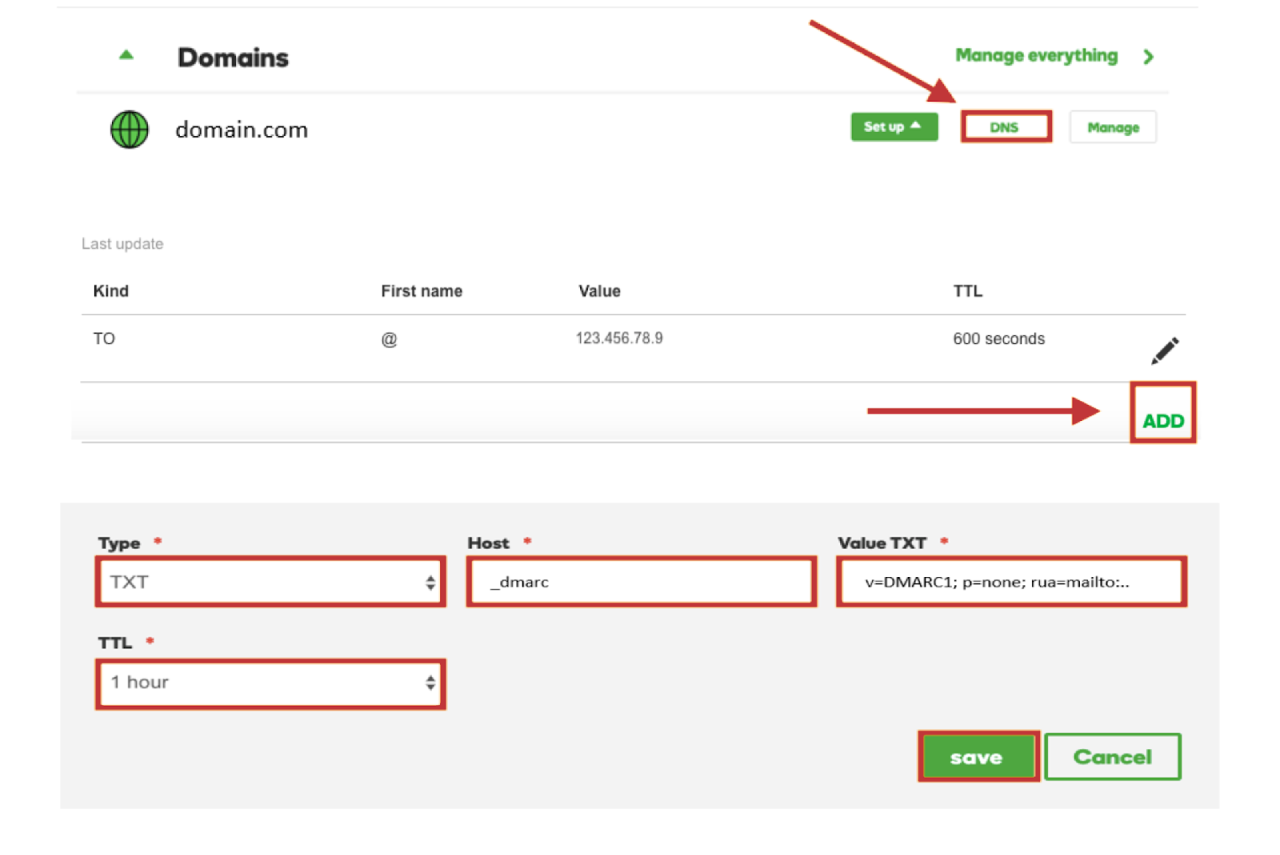
Godaddy DMARC setup in 3 simple steps
- Sign in to your GoDaddy account. Navigate to the ‘My Products’ tab and locate the domain you wish to add the DMARC record to. Click on the ‘DNS’ button next to it.
- In the ‘DNS Management’ window, click on the ‘add’ button in the ‘records’ section.
- In the subsequent form, enter the following details before clicking ‘Save’:
- From the ‘Type’ drop-down list, select ‘TXT’
- In the ‘Host’ field, enter ‘_dmarc’
- In the ‘Value TXT’ field, enter the record sent to you by email or generated using EmailAuth’s DMARC Generator.
You have now successfully added the record!
Check the published DMARC record using EmailAuth’s DMARC validator. It may take anywhere between 24 to 72 hours for the record to reflect in your DNS.
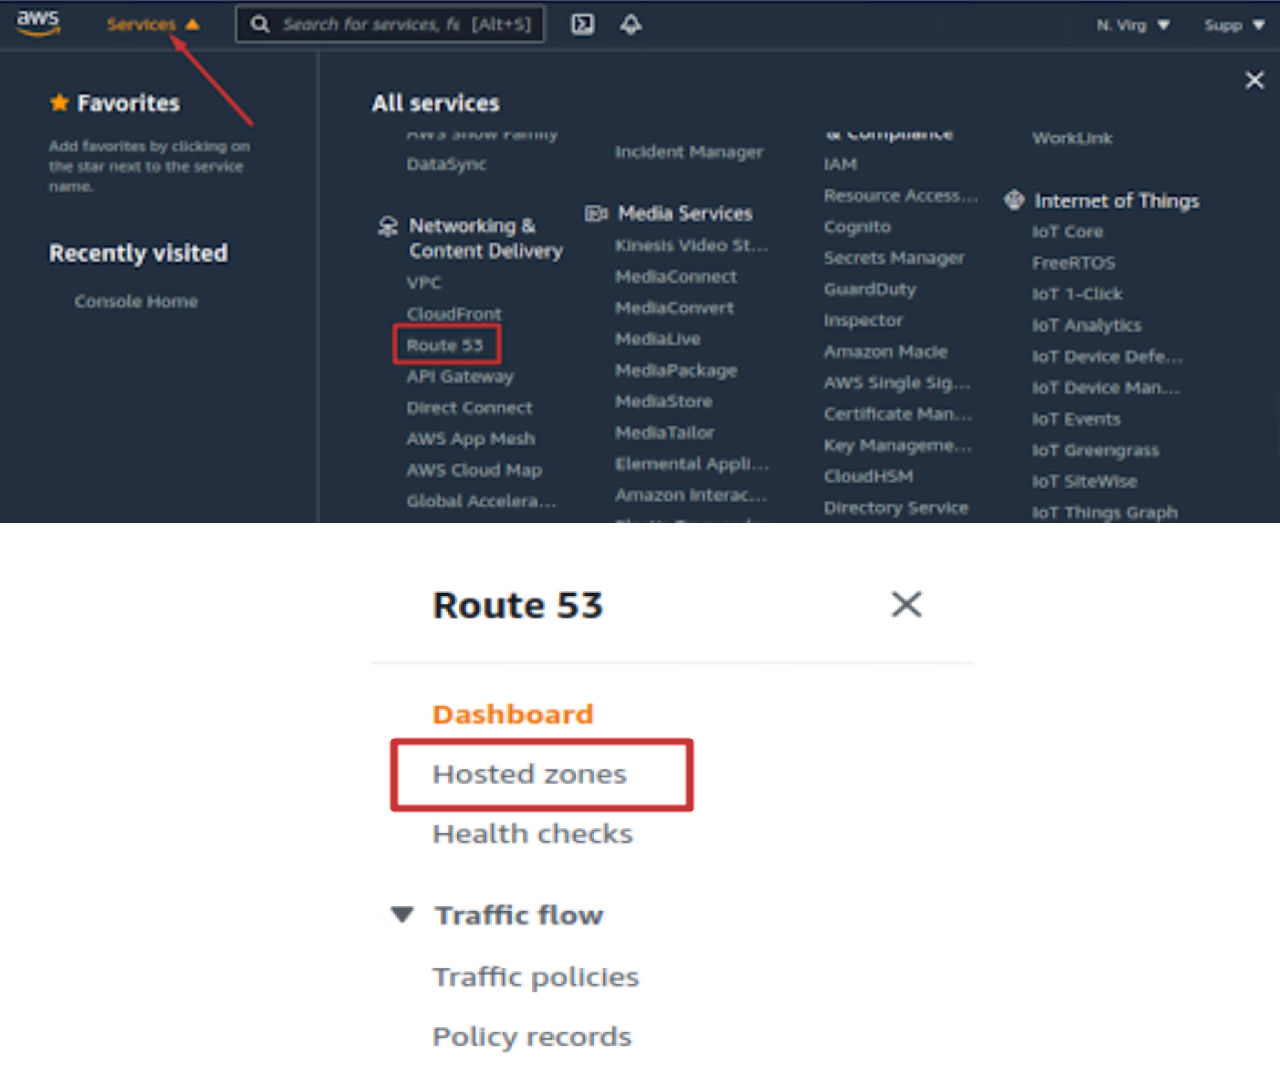
4 easy steps to publish your DMARC Record on Amazon Web Services (AWS)
- Sign in to your AWS account. Navigate to ‘Services > Network & Content Delivery > Route 53’.
- In the ‘Router 53’ console in the left pane, click ‘Hosted zones’.
- On the ‘Hosted zones’ page, navigate to the domain you wish to add the DMARC record to and click on the ‘Create Record Set’ button.
- In the subsequent form, enter the following details and then click ‘Create’:
- From the ‘Type’ drop-down list, select ‘TXT’
- In the ‘Host’ field, enter ‘_dmarc’
- In the ‘Value TXT’ field, enter the record sent to you by email or generated using EmailAuth’s DMARC Generator.
You have now successfully added the record!
Check the published DMARC record using EmailAuth’s DMARC validator. It may take anywhere between 24 to 72 hours for the record to reflect in your DNS.
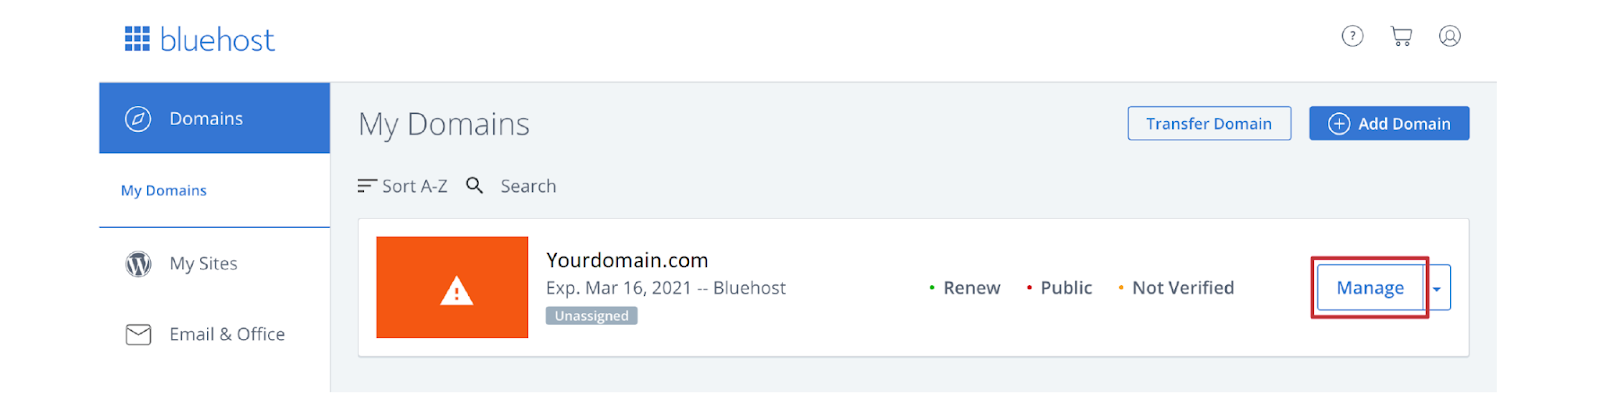
Bluehost DMARC Records Setup in 3 simple steps
- Log in to your Bluehost account. Navigate to your Dashboard and locate the domain you wish to add the DMARC record to. Click on the ‘Manage’ button.
- Go to the ‘DNS’ tab, scroll down to the bottom of the page to the ‘TXT(Text)’ section, and click on the ‘Add Record’ button.
- From the ‘Type’ drop-down list, select ‘TXT’
- In the ‘Host’ field, enter ‘_dmarc’
- In the subsequent form, enter the following details before clicking the ‘Add Record’ button:
- In the ‘Value TXT’ field, enter the record sent to you by email or generated using EmailAuth’s DMARC Generator.
You have added the record!
Check the published DMARC record using our DMARC validator. It may take anywhere between 24 to 72 hours for the record to reflect in your DNS.
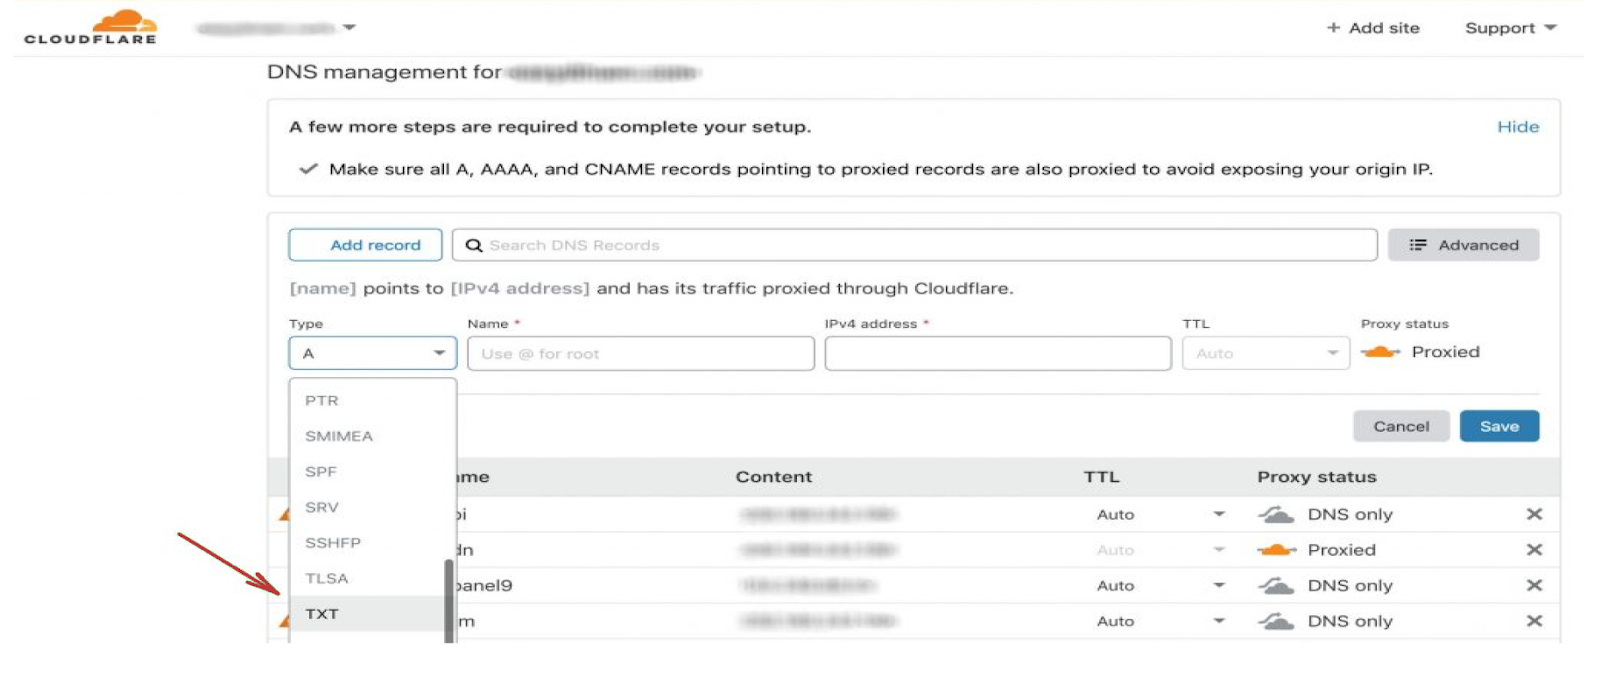
Publish your DMARC Records on Cloudflare in 3 steps
- Log in to your Cloudflare account.
- Navigate to your dashboard, locate the domain you wish to add the DMARC record to, and click on the ‘DNS’ button.
- On Cloudflare’s DNS management page, enter the following details and click the ‘Add Record’ button:
- From the ‘Type’ drop-down list, select ‘TXT’
- In the ‘Host’ field, enter ‘_dmarc’
- In the ‘Value TXT’ field, enter the record sent to you by email or generated using EmailAuth’s DMARC Generator.
You have now successfully added the record!
Check the published DMARC record using EmailAuth’s DMARC validator. It may take anywhere between 24 to 72 hours for the record to reflect in your DNS.
Publish your DMARC Records on DreamHost in 3 steps
- Log in to your DreamHost ‘Control Panel’. In the ‘Main Menu’, navigate to ‘Manage Domains’.
- Under your desired domain, click on the ‘DNS’ link.
- In the subsequent form, enter the following details and click the ‘Add Record Now’ Button:
- From the ‘Type’ drop-down list, select ‘TXT’
- In the ‘Host’ field, enter ‘_dmarc’
- In the ‘Value’ field, enter the record sent to you by email or generated using EmailAuth’s DMARC Generator.
You have now successfully added the record!
Check the published DMARC record using EmailAuth’s DMARC validator. It may take anywhere between 24 to 72 hours for the record to reflect in your DNS.

Publish DMARC Records on HostGator in 3 easy steps
- Log in to your HostGator account and open your ‘cPanel’.
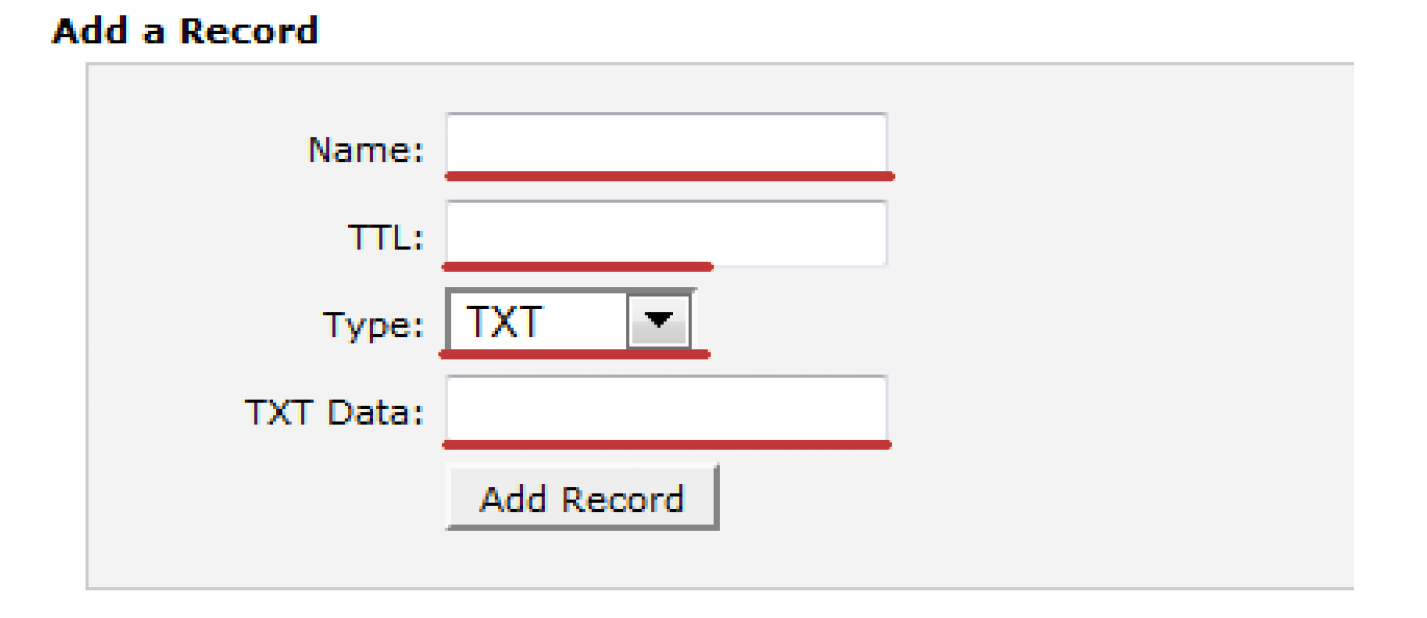
- Navigate to the ‘Domains’ section and click on ‘Advanced DNS Zone Editor > Add Record’.
- In the subsequent form, enter the following details and click the ‘Add Record’ button:
- In the ‘Name’ field, type ‘_dmarc’.
- From the ‘Type’ drop-down list, select ‘TXT’.
- In the ‘TXT Data’ field, enter the record sent to you by email or generated using our DMARC Generator.
You have now successfully added the record!
Check the published DMARC record using EmailAuth’s DMARC validator. It may take anywhere between 24 to 72 hours for the record to reflect in your DNS.
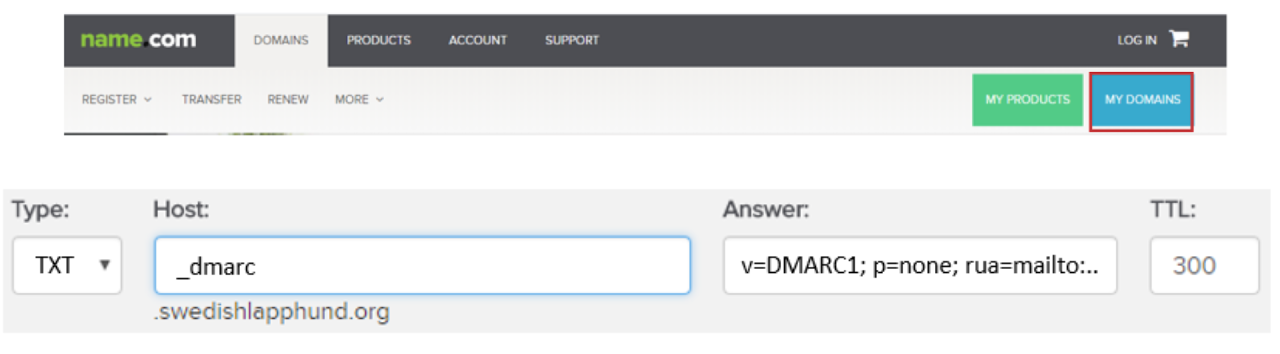
Publish a DMARC Record on name.com in these 3 easy steps
- Log in to your Name.com account and click on the ‘MY DOMAINS’ button.
- Select the domain name you wish to create a TXT record for and click on ‘Manage DNS Records’.
- In the subsequent form, enter the following details and click on the ‘Add Record’ button:
- In the ‘Host’ field, type ‘_dmarc’.
- From the ‘Type’ drop-down list, select ‘TXT’.
- In the ‘Answer’ field, enter the record sent to you by email or generated using EmailAuth’s DMARC Generator.
You have now successfully added the record!
Check the published DMARC record using EmailAuth’s DMARC validator. It may take anywhere between 24 to 72 hours for the record to reflect in your DNS.
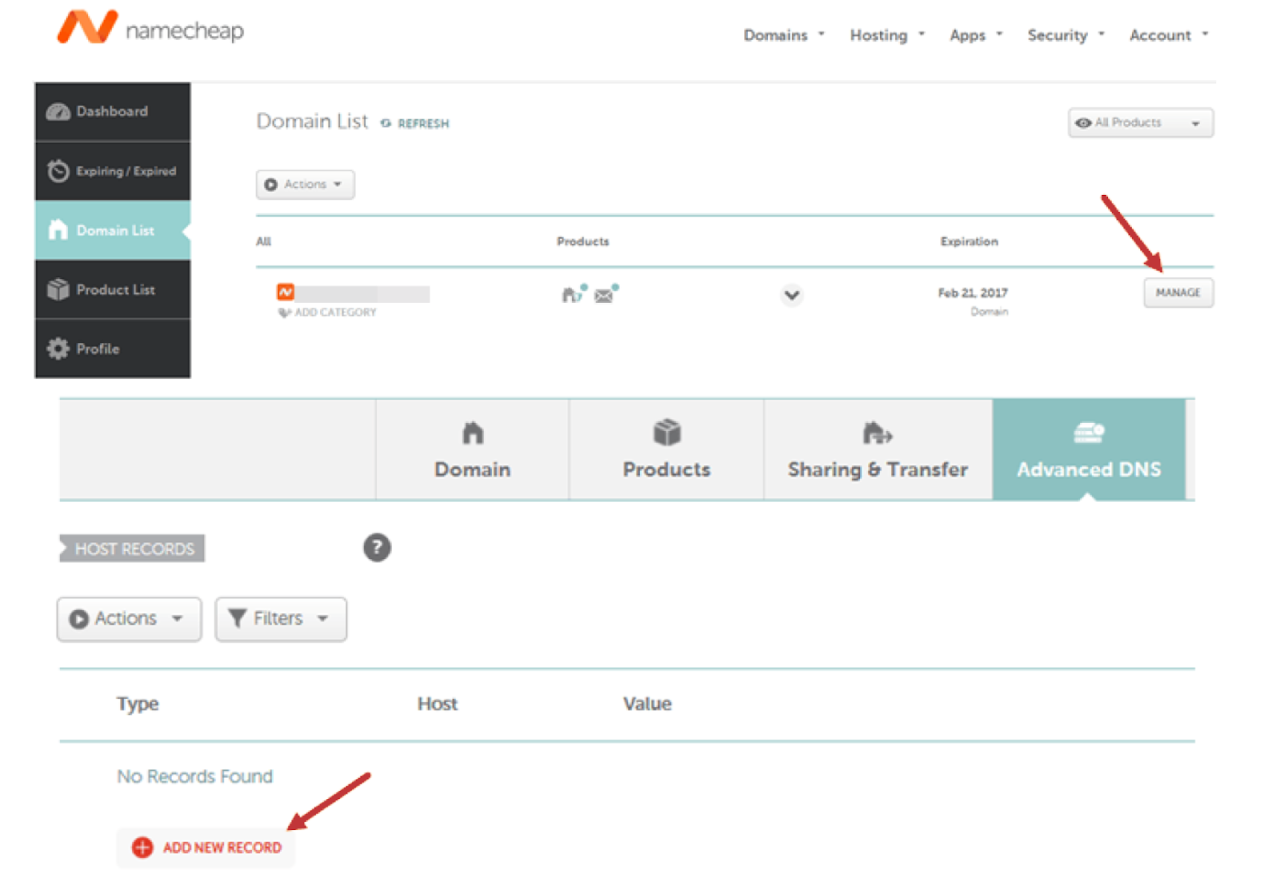
Steps to publish your DMARC Record on Namecheap
- Log in to your Namecheap account and navigate to ‘Dashboard > Domain List > Manage’.
- Go to the ‘Advanced DNS’ tab and at the bottom of the list and click on ‘Add New Record’.
- In the subsequent form, enter the following details and click on the ‘SAVE ALL CHANGES’ link:
- In the ‘Host’ field, type ‘_dmarc’.
- From the ‘Type’ drop-down list, select ‘TXT’.
- In the ‘Value’ field, enter the record sent to you by email or generated using EmailAuth’s DMARC Generator.
You have now successfully added the record!
Check the published DMARC record using EmailAuth’s DMARC validator. It may take anywhere between 24 to 72 hours for the record to reflect in your DNS.
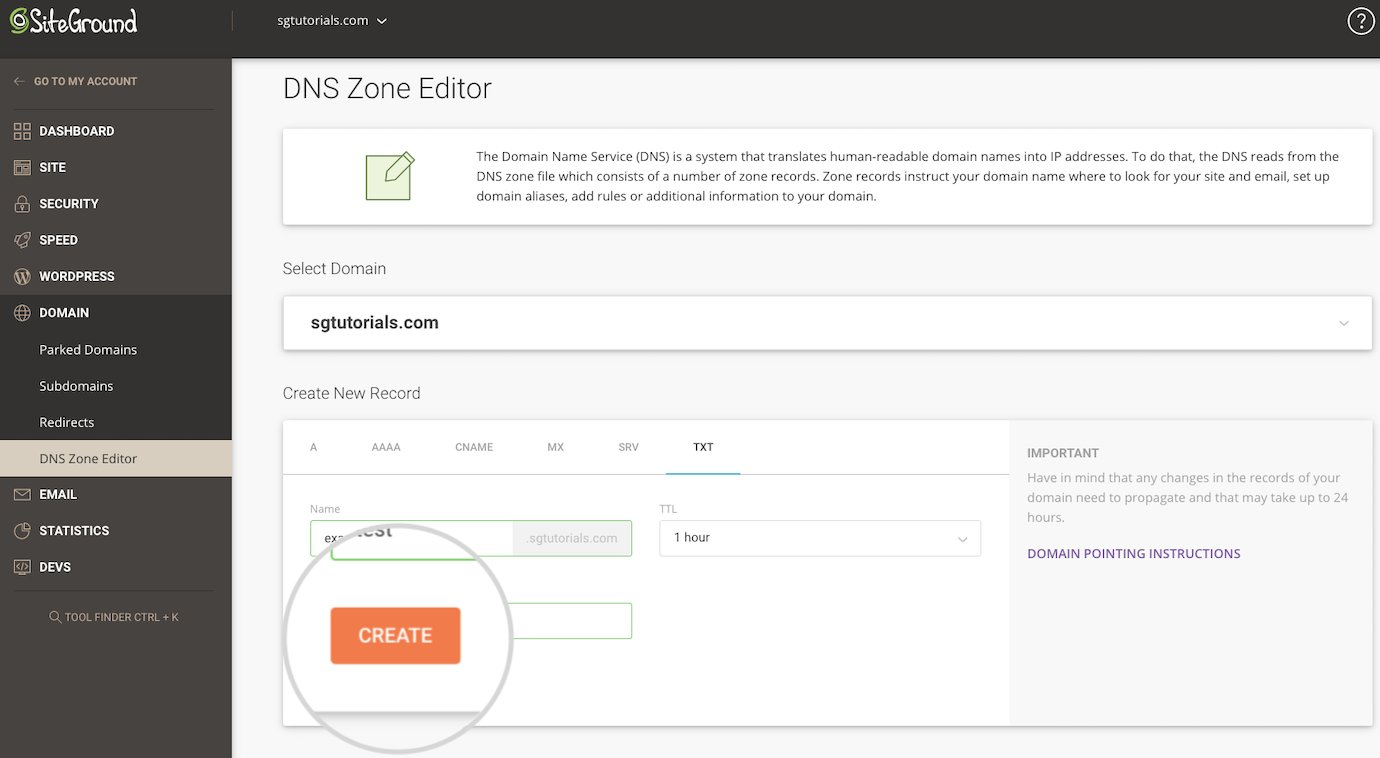
3 simple steps to publish your DMARC Record on Siteground
- Sign in to your Siteground account. Navigate to ‘Site Tools > Domain > DNS Zone Editor’.
- From the ‘Create New Record’ choose ‘TXT’.
- In the subsequent form, fill in the following information and click on ‘Create’ to create the new record.:
- In the ‘Name’ field, enter ‘_dmarc’.
- In the ‘Value’ field, enter the record sent to you by email or generated using EmailAuth’s DMARC Generator.
You have now successfully added the record!
Check the published DMARC record using EmailAuth’s DMARC validator. It may take anywhere between 24 to 72 hours for the record to reflect in your DNS.
Publish a DMARC Record on cPanel in these 3 easy steps
- Log in to your cPanel account and navigate to the dashboard.
- Navigate to the ‘Domains section > DNS Zone Editor’. Click on the ‘Manage’ button for your desired domain.
- In the form that appears, enter the following details and click on the ‘+Add Record’ button:
- In the ‘Host’ field, type ‘_dmarc’.
- From the ‘Type’ drop-down list, select ‘TXT’.
- In the ‘TXT Value’ field, enter the record sent to you by email or generated using EmailAuth’s DMARC Generator.
You have now successfully added the record!
Check the published DMARC record using EmailAuth’s DMARC validator. It may take anywhere between 24 to 72 hours for the record to reflect in your DNS.
